Second Creek has shut down (ca 2005). Development is threatened but the track is still there as of 2019.
Major portions of this page were contributed by Mark Shumaker. Click here for general information on how his pages are set up. He last updated his descriptive materials on 2 July 1995.
', trackOffice => '
Second Creek Raceway
17010 East 88th Avenue
Route 1, Box 113
Commerce City CO 80022
303-371-6661
303-371-6662 (fax)
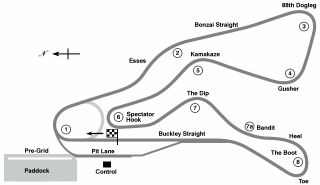
The map presently available is:

Second Creek is built on the site of what was once the Denver Dragway, which was active in the 1960\'s and 1970\'s until increasing speeds caused the (uphill) shutoff area to become inadequate. (There\'s a story, which may be legend, about a dragster losing its chutes and ending up on the south side of 88th Avenue after passing through three catch fences and the porch on the track manager\'s house.) The first race on the road course, which uses part of the old drag strip for its front straight, was held in 1982.
', weatherID => 'USCO0105', weatherZIP => '', officialWebSite => '', schedulePage => '', resultsPage => '', ticketsPage => '', gettingThere => '', racersGuide => "You do not need to cross the track to enter or leave the paddock. There is sufficient paddock space to accomodate 80 cars comfortably. Part of the paddock is paved, enough to support about 30 cars, with the rest graded and gravelled but smooth enough to present no hazard to low-ground-clearance cars. There is some overflow paddock space on dirt south of the main paddock, but moving inactive trailers out of the paddock is recommended at large races (such as the traditional Labor Day double event which draws around 100). The track manager is willing to accomodate out-of-division drivers; if you call him a week or so before the event and discuss your pit space requirements, he will be happy to work with you -- just be reasonable. If you must have electricity, try to arrange for space near the far south end of the paved paddock, where there is usually space on gravel reasonably close to the (only one) 115 V power outlet. If you end up on the pavement, do not spill oil or gasoline onto, nor poke holes into, the paved surface. Tech and Impound frequently occupy most or all of the paving in this area, but at large events are sometimes banished to the extreme north end of the paddock.
Food and water are available at the track; but no ice, auto parts, or souvenirs. Goodyear and Hoosier tires are serviced by Road Racing Services in Denver at (303) 973-8005; make arrangements well in advance if you intend to pick up new tires at the track. Air is available from the tire concession but there is no fuel service; you must bring your own. There is a Spec Racer preparation shop (Eurosport) on the track grounds, you might be able to arrange (well in advance) with Rich there for a supply of unleaded fuel; (303) 375-9775.
", hotLap => "Second Creek is at 5200 feet altitude; it is 1.7 miles long, 14 turns (10 flag stations), with two 2000-foot straights, and is 32 feet wide. There is a substantial but mostly gentle elevation change. The track can be run either clockwise or counter-clockwise; at double events it is sometimes run once each way (to confuse drivers from outside the Division). Entry to the false grid and the track, and exit from the track, are non-intuitive to the first-timer; get a local competitor to explain them to you.
Second Creek is a very tight and low-speed course; CSR cars using all five gears in a five-speed gearbox reach a top speed around 105 MPH and take the slowest corner under 45 MPH. The track surface is mostly smooth, but the braking area into turn 4 is quite rough and the entire surface is extremely abrasive -- in all the corners you will find sharp-edged crushed granite stones protruding about a quarter-inch above the worn-away asphalt matrix. You must run hard-compound tires and stay on the racing line since torn-off bits of rubber collect badly off the line in the turns. There are 6\" to 8\" dropoffs outside the exits of several corners. Hazardous areas are well protected with multiple-depth tire barriers; it might just be possible to end up in an oil well pumping mechanism on the outside of Turn 1 or 5, or in the track manager's kitchen on the outside of Turn 10A, but these would be most unlikely to occur. The track is available for testing before most events; contact the track manager for details.
What follows is a generic description of the track when raced clockwise, describing its features without defining speeds, gears, or shift points -- all of which will vary widely from car type to car type.
Most of the turns at Second Creek are sufficiently well separated by straight segments that they may be treated as isolated turns. There is only one set of turns which might need to be treated as cluster turns (where your line through or out of a turn must be modified to accomodate the requirements of the next turn or the one after it), Turns 8 through 10A.
Entry to the track for practice and qualifying is usually through the gate near the paved paddock area. The false grid for the races is entered from the extreme northeast corner of the paddock. You will have to back into position on the false grid at the south end of this access road; if you do not have a working reverse gear you will need to be pushed back into position. When the track is being run clockwise, you must make a very tight U-turn to get out onto the track.
The starter's stand is visible to all drivers at the start. The front straight is slightly downhill, then flattens out into Turn 1, known as the Oval, a flat fairly fast slightly decreasing-radius 135-degree right-hand sweeper. There is a slightly downhill short straight (in truth, there are no really long straights at Second Creek) leading into Turns 2 and 3, known as the Esses. Turn 2 is a very fast left-hand kink that should be taken flat out, and Turn 3 is a slightly tighter right-hand kink that can be taken flat out by most cars. Another short straight with a nearly imperceptible kink near the end leads into Turn 4, known as the Dogleg. The braking area into Turn 4 is quite rough. Turn 4 is a fairly slow uphill slightly-banked 120-degree right-hand turn followed by a short uphill straight into Turn 5, known as the Gusher (yes, one of the track's oil wells is nearby). Turn 5 is a somewhat faster slightly-banked 90-degree right-hand turn that goes slightly off-camber past the apex.
Following Turn 5 is a short straight leading into Turn 6, known as the Kamikaze, a fast left-hand 60-degree turn that is far enough from Turn 5 that you may have reached sufficient speed to require that you lift or brake to set up for it. There is an unnumbered fast right-hand kink following closely after Turn 6; after the kink you must get back quickly to the extreme right edge of the track for the entry to Turn 7.
Turn 7, known as the Spectator Hook, is a very slow slightly-banked slightly uphill 150-degree left-hand turn. The track edge at the exit is broken up and there are very deep ruts just off the edge. A short straight follows, with a little (unnumbered) left-hand kink that is taken flat out by most cars. Hug the left edge of the track at the exit of this kink to set up properly for braking into the beginning of the Turn 8 - 9 - 10A cluster. Turn 8, known as the Dip, is a fairly slow 90-degree right-hand turn that exits uphill and is followed by short uphill straight into Turn 9, a fast slightly-uphill 45-degree left-hand turn known as the Bandit. You may need to adjust your track position coming out of Turn 8 to assure that you can make a sufficiently late apex in Turn 9 to allow a proper entry into Turn 10A.
Turn 10, known as the Boot, is a two-part right-hand turn. Turn 10A, the Heel, is a fast decreasing-radius slightly uphill 45-degree right-hand turn; some cars treat it as a double-apex turn. You should locate yourself at the exit of 10A so that you will have enough room to brake for Turn 10B. Known as the Toe, 10B is a very slow (slightly faster than Turn 7) slightly downhill 135-degree right-hand turn. The track edge at the exit is broken up and there are very deep ruts just off the edge, so you must exercise some care -- but your exit speed from this turn is critical for speed down the front straight.
Following Turn 10B is a short downhill straight leading into an unnumbered turn known as the Kink, a very fast 45-degree left-hand turn leading onto the short front straight. The straights after 10B and the Kink are both long enough to permit setting the car up properly for the following turns.
The pit lane entrance is on the left after the Kink.
", workersGuide => '', foodInsert => '', hotelInsert => '', TOCInsertLink1 => '', TOCInsertText1 => '', TOCInsertLink2 => '', TOCInsertText2 => '', TOCInsertLink3 => '', TOCInsertText3 => '', TOCInsertLink4 => '', TOCInsertText4 => '', TOCInsertLink5 => '', TOCInsertText5 => '', TOCInsertLink6 => '', TOCInsertText6 => '', offsiteTOCInsertLink1 => '', offsiteTOCInsertText1 => '', offsiteTOCInsertLink2 => '', offsiteTOCInsertText2 => '', offsiteTOCInsertLink3 => '', offsiteTOCInsertText3 => '', offsiteTOCInsertLink4 => '', offsiteTOCInsertText4 => '', offsiteTOCInsertLink5 => '', offsiteTOCInsertText5 => '', offsiteTOCInsertLink6 => '', offsiteTOCInsertText6 => '', &>