
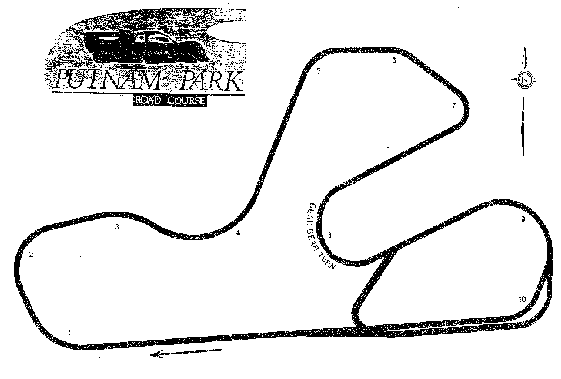
Putnam Park is a 1.8 mile, 10 turn road course, about 30 miles west of Indianapolis near Mount Meridian. The track was repaved in November of 1996.
Last Updated: 2006-02-19
The track opened in 1992. It was for a time used heavily by the Indianapolis and Cincinatti Regions of the Sports Car Club of America. The SCCA no longer runs at Putnam Park, due to differences of opinion with track management regarding certain safety issues. Putnam Park continues to be used for testing and tuning by various amateur and professional racing teams, as well as for Club driving schools.
| Allan E. Brown, The History of America's Speedways: Past & Present. Comstock Park, Michigan: Brown, 2003 , ISBN 0931105617 , pp. 291. Order from National Speedway Directory |
Putnam Park
5251 S County Road 550 E
Cloverdale, IN 46120
317-875-7417
The map presently available is:
For information on how these aerial images work, Click Here.
You may also wish to try using the Yahoo! Search as it may produce current news items.
Putnam Park is to the northeast of the intersection of East CR-550 South and South CR-550 East (I'm not making this up.)
Hot Lap courtesy of Chris W. Ingle, 2003 Southeast Division T1 National Champion, #7 T1 Corvette Z06. Track Tapes has a video of laps of this track as driven by Chris.
Overall, Putnam is one of the best kept secrets of all the tracks out there. It is a 10 turn course with no remarkable features, no major top speeds, minor elevation changes, a bit bumpy in places, semi-abrasive surface, and there are no major amenities there. It�s basically similar to Roebling in that it�s just a neat track in the middle of a field. What makes the track special are the flowing corners and the safety. It has tons of run off room so you can afford to experiment with different lines and speeds thru the corners. The only real dangerous part is the last series of corners. There is Armco separating the track from the paddock area. Years ago, the Armco was only 2 or 3 feet off the final turn, but they finally realized this and moved it back to a much better distance and put a tire wall in front of it to make it much safer.
There are some fast corners, some slightly off camber and some semi-blind apexes but nothing to really be concerned about. Several corners are long and steady-state so it�s easy to set the car up perfectly and move it around transitioning from understeer to oversteer. Patience and smoothness is rewarded here. Trying to go ultra fast thru one corner can get you out of position for the next one. It rates moderate to heavy on braking so it�s a good idea to have an extra set standing by. Good brake ducting also really helps.
It helps to have a neutral car here that you can easily point where you want it to go. This track is designed to set a car up so you�ll find out quickly if your car wants to understeer or oversteer. The curbing/rumble strips are reasonably smooth but small so it makes it easy to determine if you�re using the entire track or not. The small curbs on the outside don�t allow too much room for error, but as stated before, there�s an abundance of runoff space if you put a wheel wrong. The course is used quite a bit and kept in good condition so the tires will grip immediately. As it gets hotter though, power on traction becomes more of a problem. It�s an easy track to learn but hard to master because most drivers are simply not patient enough to be consistent -- which is required here for close, fast lap times.
All shift points and approximate speeds are relative to my T1 prepared 2001 Corvette Z06.
Leaving the pits, stay to the left as cars will be coming out of turn 10 blasting down the straight toward turn 1. Check your mirrors carefully and stay left to set up for turn 1. The straight is a bit bumpy and you�ll be in 4th approaching the braking zone. Heel-toe to 3d. Turn 1 is a medium right hand 45 degree turn with small curbing on the inside (as are just about every corner). The whole track is fairly narrow so it�s ultra important to nail every apex and track out just to the curbing. Keep expanding your line until you hear the tires run over the rumbles on the curbing -- that�s far enough!
Turn 2 is a smooth transition from 1. It�s another right hand 60 degree turn which is very fast. Again, use the entire track. Just take a standard mid apex.
Turn 3 is an ultra quick 30 degree right hand kink. As you exit it, you�ll be on the left side of the track for the entrance of the 45 degree left hand sweeping turn 4, which goes over a slight rise so the car will get very light. Don�t bother trying to get back to the right after 3. Just use the straight line area for braking and hug the left curbing of this off-camber fast corner. Run your left tires over the curbing. Unwind the wheel past the apex to get the best possible exit speed. This is a tricky corner and hard to get perfect.
You�ll most likely still be in 3d gear, but really starting to wind it up. Get back to the left and set up for a right hand 60 degree turn #5. This is a good place to lightly trail brake to get the front end to bite.
Accelerate hard out and blast thru the next right hand 30 degree kink. This is really fast so be smooth and hit that apex.
Brake very hard for turn 7 -- a 110 degree, right hand, late apex corner that�s even tighter than it looks. Once thru 7, get back to the right for the carousel.
The Carousel or 'Dead Bear Turn' is turn 8. This is where patience really pays off. The turn is a long lefty, slightly up hill. Aim for a very late apex and control the impulse to burn up the rear tires. Keep oversteer in check and stay smooth. The exit area is right where a cut-thru road intersects but there�s not much room after that and there�s a big bump if you exit too wide.
Lay the power down hard all the way up to turn 9 which is essentially one big 120 degree turn broken down into two corners, both about 60 degrees. Trail brake the entry of 9 and apex it as a normal turn. The perfect track out for 9 is just before the turn-in point for 10. It�s a small curb on the left side. It�s also the far side of the pit lane entrance. If you do these right, you�ll gradually increase your throttle from the entry of 9 thru the exit of 10. 10 is normally slicker than it looks so you may need to 'drop throttle� to rotate the car enough to hit the apex.
Power down the straight, shift 3-4, check your gauges and watch for cars coming out of the pit lane.
There are several places on this track where you could shift to 4th and then right back down to 3d again. Depending on how high you have your rev limiter set and how hard you want to work your engine will dictate whether or not you need to shift between the corners.
Putnam is a handing and torque track. The exit of the corners is far more important than the entrance. Keep playing with tire pressures and camber until you can exit most of the corners under full power without burning up the rear tires. It�s a spacious track (nothing blocking your view) so keep your head and eyes up. Great little track! Enjoy!
Chris W. Ingle www.tracktapes.com

This work is licensed under a Creative Commons Attribution-NonCommercial-ShareAlike 2.5 License.