Mid-Ohio Sports Car Course
7721 Lexington Steam Corners Road
Lexington, OH 44904-0108
Mid-Ohio Sports Car Course
P.O. Box 3108
Lexington, OH 44904-0108
419-884-4000
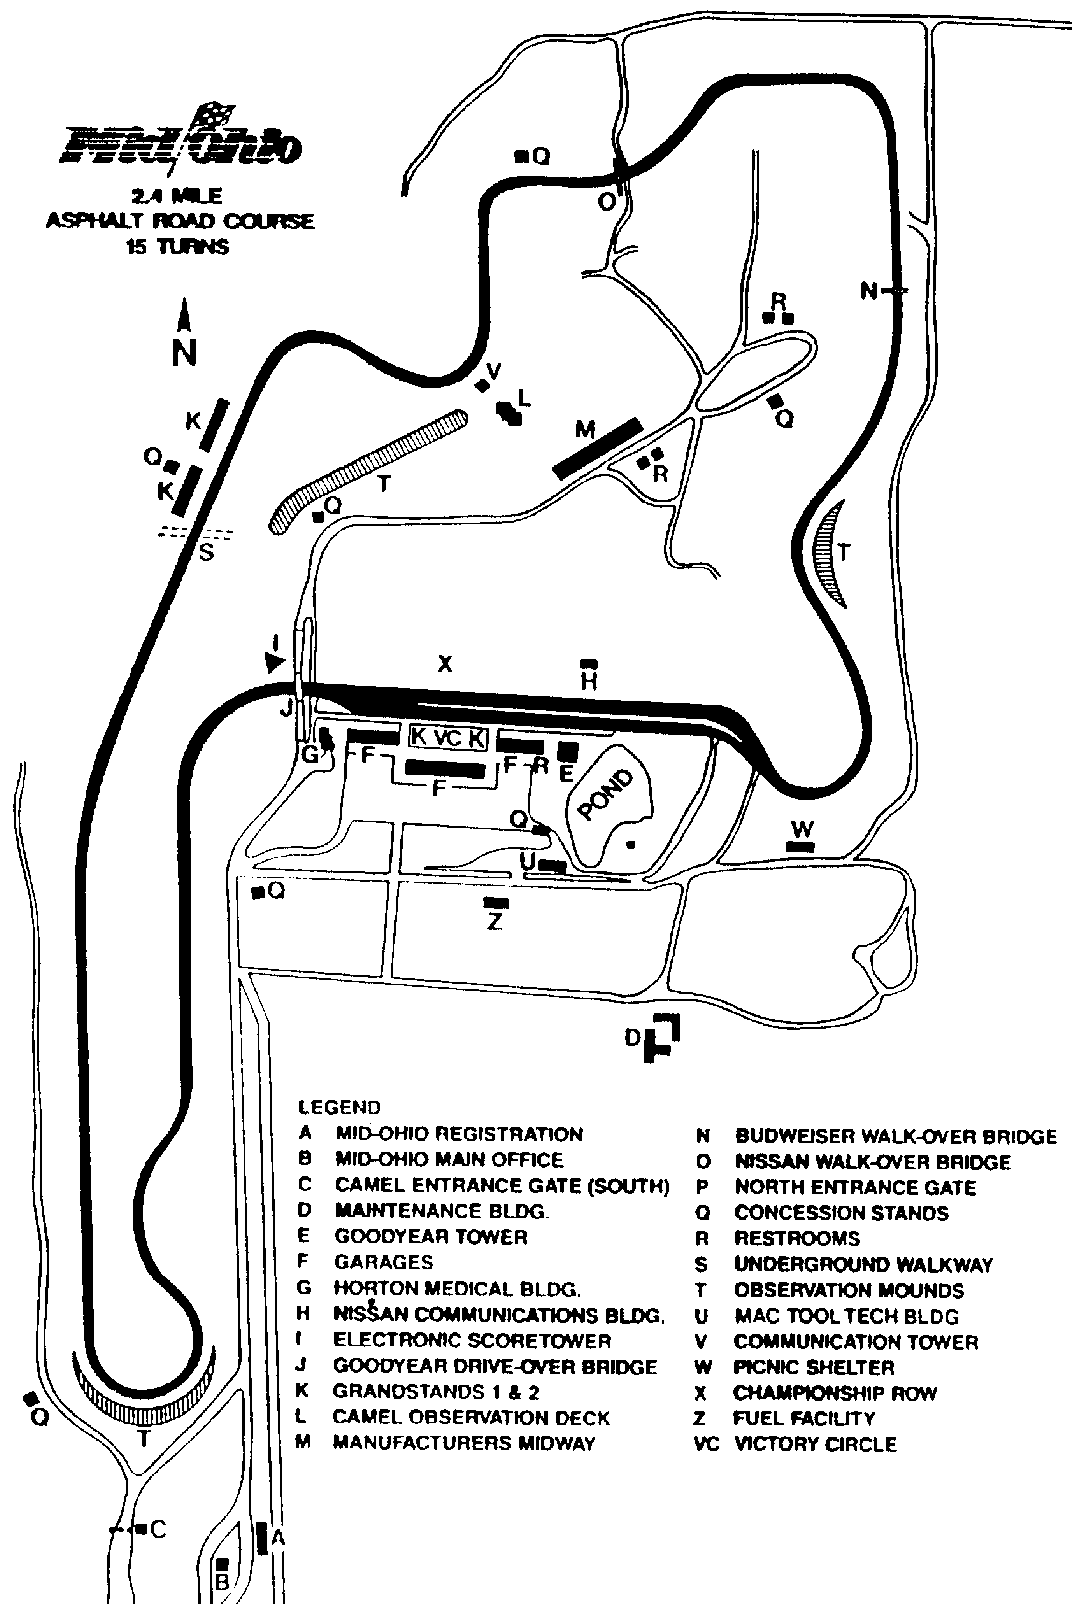
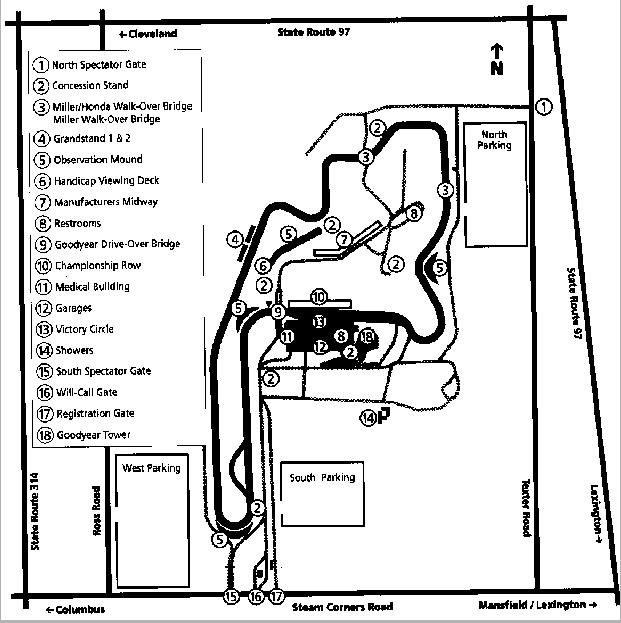
The maps presently available are:
The track opened September 22nd, 1963. The SCCA Runoffs were hosted here from 1994 to 2005.
', reference1=>'AmericasSpeedways', reference1pages=>'562', weatherID => 'USOH0549', officialWebSite => 'http://www.midohio.com/', racingReferenceID=>'198', hotLap => "Hot Lap courtesy of Chris W. Ingle, 2003 Southeast Division T1 National Champion, #7 T1 Corvette Z06. Track Tapes has a video of laps of this track as driven by Chris, including footage from the SCCA Runoffs.
Overall, Mid Ohio is a very technical track and quite frankly, dangerous road course near Mansfield, Ohio. It is a handling track more so than just horsepower and has just about everything a great road course should have -- elevation changes, high speed straights (near 140 mph), fast 'pucker-factor' corners, and a few tight corners thrown in just for good measure. Extremely challenging, it takes lots and lots of seat time here to be fast. Do not expect to make drastic lap time improvements from visit to visit -- it comes in tenths of a second and sometimes hundredths. The bad part about this track though is that there is little room for error. A large part of the course is bordered by concrete walls and in some places is very close to the racing surface. You really have to pick your spots to push the limits here because the consequences are painful and expensive. Over the years, Mid Ohio has improved the safety adding more tire walls and extending the gravel traps while moving back some of the railings.
Mid Ohio has one of the worst surfaces though of any track you'll drive. It's a myriad of concrete patches, asphalt and other places where the surface is simply crumbling from use. The curbs are extremely high and very unsettling. The concrete patches have recently been ground away slightly, which is now more abrasive to tires, less bumpy and grips better in the wet.
The amenities of Mid Ohio are what you'd expect from a track that hosts some of the best racing in motor sports -- professional garages, large paved paddock area, permanent admin buildings, great viewing/vantage spots, etc.)
It helps to have a neutral car here that you can easily point where you want it to go and one that can easily be recovered (forgiving) if you make a mistake. A car that understeers or oversteers severely will most likely find the gravel traps or worse some time during the weekend. The curbing is high and unsettling so it helps to have a compliant suspension to take advantage of some of them. Most however, you want to avoid. The course is used a lot and kept in fair condition so the tires do grip pretty well immediately. It's an extremely difficult track to learn and master because of blind apexes, elevation changes, and ever-present concrete walls. The track is still narrow and bumpy despite the small improvements to the concrete patches.
All shift points and approximate speeds are relative to my T1 prepared 2001 Corvette Z06.
Leaving the pits, stay to the left as cars will be coming thru turn 1 off to your right. There is a 'merge' area separated by a large concrete curb, but cars will be flying thru there heading to turn 2 - so check your mirrors carefully.
As you head up hill toward 2 and the chicane, you should be in 4th gear. You need to line up on the left side of the track. Turn 2 is just the entrance to the chicane and should be full throttle (flat) or nearly so. Once at the apex, straighten the wheel immediately and brake very hard. Don't be too concerned about nailing the first apex on the left of 3. This will allow you to keep momentum thru the chicane. You can either heel-toe downshift to 3d here or wait until you have completed the chicane (at the entry to 4). Either way seems to work -- just do whichever is most comfortable to you.
Lightly trail brake turn 3 to the left, which should allow you to get back on the throttle and hit the next apex aiming straight for the entrance of the keyhole (turn 4). The entrance is up hill so you can brake much harder than you think.
Turns 4 and 5 (The Keyhole) is a right-hand, double apex corner and the first apex is the red and white curbing on the right basically at the entrance. As you are braking and go past this curbing, the car should end up about a car width from the right side curbing. The left front edge of the concrete patch should be between the front wheels. Again, trail braking thru here will help rotate the car and get it pointed where you want. It's important to be patient here though because the track now slopes down hill. You'll want to get on full power, but you must wait until the car comes around a bit more. Steer the car with the throttle thru the corner. Once the car is pointed down the hill toward a late second apex (turn 5), you can now start applying a smooth throttle to exit the corner. This is the most important corner on the track as it leads to the longest straight and to one of the few passing zones at the end. You can use the curbing at the exit, but remember, it's extremely high and tends to jerk the car if you hit it. Make sure you have a good grip on the wheel if you plan to use the curbing!
If you are running the course without the chicane, you still want to be lined up on the left side of the track upon entry into the keyhole (turn 4). Since the braking zone is uphill, you can use this passing zone to late brake your rivals. Don't be too concerned about braking up the far left side though because the track is bumpy here. The correct braking line is probably at a diagonal to the keyhole, but keep trying different lines until you find where the car is 'happiest.' If you brake at the very left edge of the road, you will leave the door open for someone to out brake you. Trail brake the corner and rotate the car. The rest of the corner is the same. The late apex (or Turn 5) is key for fast straight away speed.
Shift 3-4 after the exit of 5. Keep your head and eyes up and check your gauges.
Turn 6 is just the kink on the straight. Take it flat out, but the shortest distance between two points is still a straight line so nail the apex.
Turns 7 thru 15 are where the most amount of time is made (or lost) at Mid Ohio.
Turn 7 is a very fast, down hill, right hander. You need to carry as much speed as possible thru here because turn 8 is essentially a throw-away corner. You can apex 7 earlier than you think so your exit is two-thirds to three-fourths of the way to the left side of the track. When you do it right, you'll be flying thru 7 nailing the gas at the apex using a very late braking zone up the hill to 8. You can either heel-toe downshift 4-3 at the entry of 7 or at the entry to 8, depending on the car. I like carrying 4th gear thru 7.
If you can get back to the right a little to set up a bit better for turn 8, so be it, but do not sacrifice exit speed at 7 for a better entry to 8. Because the apex of 8 is at the top of the rise it doesn't really matter where the entry point to the corner is. A stable entry to the corner is important though so use the uphill braking zone to settle the car and heel-toe downshift if you didn't do it before 7. As you come over the top of 8, open the wheel which will allow you to accelerate and stable the car down the hill to turn 9.
Bigger, high HP cars may not be able to get back to the left before the right-hander turn 9. Don't be too concerned about that. Just make sure the car is straight and settled even if the car is pointing a little to the left side of the track. Trail brake this corner and rotate the car upon entry, nail the apex and don't track out more than about 2/3 of the way out. A good exit speed and position is better than a fast entry speed and poor exit position just before going into 10.
Turns 10A, 10B and 11 are very fast and tricky. Turn in smoothly for the left hander 10A and apex at the left side of the track at the end of the curbing. Get the car going straight over the hill and as soon as the car comes over the crest and settles slightly (end of curbing on left), turn in smoothly for the right hand 10B. Don't be too concerned with the apex here. Missing the apex by a foot or two simply gives a better entry into 11. The road rises up at the apex of 10B as well so steering input here should be very gentle due to the compression. Straighten the car out as much as possible and gently apply the brakes. You'll be carrying much more speed than you think is possible so smoothness is essential!
Keep the front of the car loaded for the entry into the fast right hand turn 11. You'll have to trail brake here due to the strange camber. The apex of the corner is earlier than expected and quite frankly, scary! The track opens up quite a bit but you come over the hill and a large concrete wall is staring at you. By the time you hit the apex, you should be able to accelerate hard if you open the wheel and allow the car to track out to the exit. Do not tighten the steering over the top of the hill; unwinding the wheel will help settle it. The curbing at the exit is very unsettling and is similar to the exit at 5. It will tend to jerk the car toward the wall, so try to stay off of it as much as possible.
Heading toward the fast right hand 12, you'll be going slightly downhill and then back up again. 12 is just a bend to the right and you should be full throttle thru here. Depending on the gearing of your car, you can either shift 3-4 before 12 or just stay in 3d very high in the rpm range. After the bridge, slowly turn in for 12 trying to late apex it and line up the car with the braking markers on the right side of the track. The most important part of 12 is the exit, because it's the entry to a very fast, off-camber lefty, turn 13. The straighter you are, the easier it will be to brake and then turn for 13. Heel-toe downshift to 3d.
The turn in point is half way between the number 2 and number 1 markers. Turn in smoothly and under power. This corner is bumpy and has several elevation changes that spook even the most veteran drivers. If you trail brake, the car will get very loose and spoil your speed thru the corner. Open the wheel after the apex and accelerate out smoothly. I don't track out all the way to the curbing. I leave a foot or two at the exit to line up straighter for the entry to 14.
14 is a right hand, very tricky corner and is the entry into the carousel. Don't attempt to get back to the left for the entry. You'll open the door for a pass and the car will be very unstable out there. Instead, keep the car on the right and come straight over the rise of the hill braking smoothly and as straight as possible down the back side of the crest. The entry point to the actual corner is the left front edge of the concrete patch. Follow the edge of the initial patch around and it will lead you directly to the long apex. Don't rush to get to full throttle. The car will push initially, so steer the car with the throttle.
As you exit the long apex of 14, don't turn in for the fast lefty 15 until the car is settled and straight. Make sure you hit the apex on the left and you should be able to be full throttle thru the whole turn unwinding the wheel all the way to the exit curbing. As usual, be careful of the curbing as it can do strange things to the steering and send you into the concrete wall.
Cross start finish and shift 3-4 down the front straight. Again, depending on your gearing, you could stay in 3d or shift to 4th.
Coming into turn 1, which is the fastest corner on the track, you should be on the right side of the track. It's a blind apex so keep your head and eyes up. Brake hard on the entrance to 1 and heel-toe shift 4-3. Once the car settles turn in slowly (at the end of the fence) and try to apex about 2/3 down the yellow curbing on the left side. The left front edge of the concrete patch should run under your car. Roll the throttle down and unwind the wheel all the way to the exit. The track rises up at the exit so additional steering input is possible if needed. The curbing is very slick and unsettling so try to avoid it if possible. Shift to 4th after the exit and set up for turn 2 again.
Mid Ohio in the rain is an absolute disaster. In the past, the object was to avoid the concrete patches at all costs because they were diabolically slick due to years of use. They've recently ground the concrete patches and they actually grip better than the asphalt now. The problem though is that you still have multiple track surfaces and grip level changes. Smoothness and ultra-fast reactions are essential to driving in the rain here. I recommend trying the \"rim shot\" technique first avoiding the concrete patches and then try the more standard line using the newly ground concrete and see which style favors you, your car and your tires. If it does rain, I'd also recommend you use the deepest grooved tires you can find because of the puddles -- it just doesn't drain well. Use intermediate tires only if the track is drying quickly and there are no major puddles.
Mid Ohio is a technically challenging, gutsy track. It's imperative you keep your head and eyes up and look only where you want the car to go! Lots of practice at this track is what it takes to go consistently fast here! Enjoy!
Chris W. Ingle www.tracktapes.com
", gettingTherePre => 'Mid Ohio is located on Steam Corners Road, between Lexington and Steam Corners.
', racersGuide => '', &>