Summit Point has recently added the "Jefferson" and "Shennendoah" circuits, alternative road courses intended to expand the opportunities at the facilty .
Pro races are not presently part of the Summit Point schedule, although Summit Point has hosted IMSA and SCCA Trans-Am in the past. Currently, one SCCA National race, a large number of SCCA regionals, and two SCCA Drivers Schools occur at the track during the course of a year, as well as a large number of Club Dates put on by organizations such as the Porsche Club of America, the BMW Car Club of America, and so forth. Summit Point is also heavily used by motorcycle and kart racers.
Significant portions of this page were contributed by Wayne Burstein and Pete Cage.
Note that the current official web site is done entirely in Macromedia Shockwave, and may not be viewed unless you have a Shockwave plugin installed.
', trackOffice => '
Summit Point Raceway
Route 13 (Summit Point Road)
Summit POint, WV 25446
Summit Point Raceway
P.O. Box 190
Summit Point, WV 25446
304-725-8444
304-728-7124 (fax)
The maps presently available are as follows:
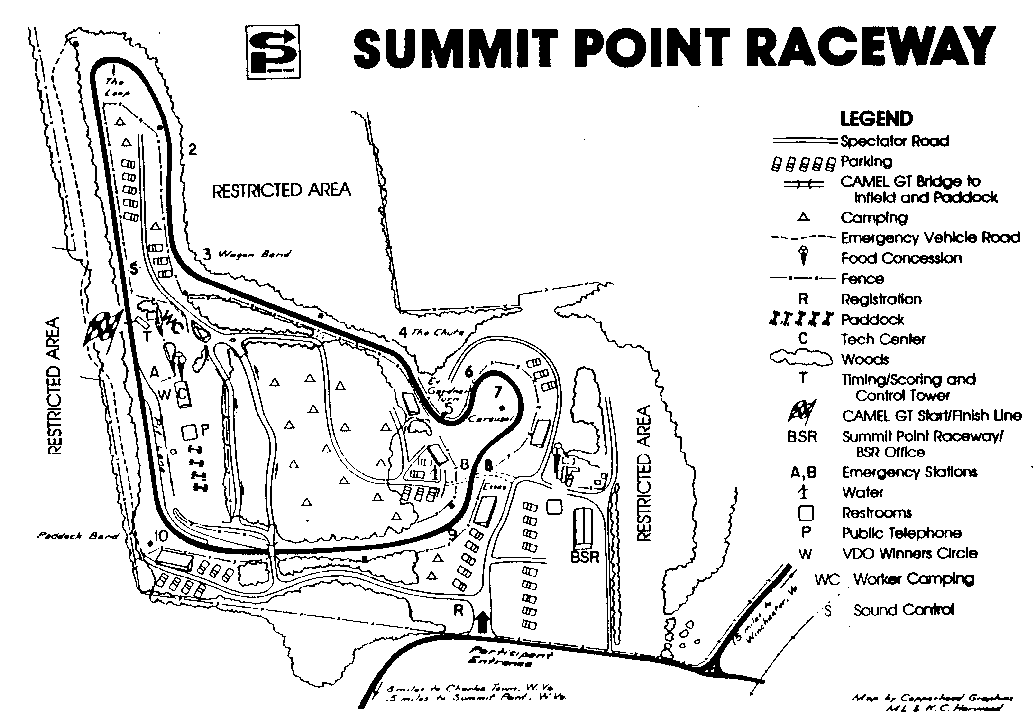
This first map is the standard map of the track, pit, paddock, and access roads:
The second map is a detailed outline of the grades and radii of the race track, all of which is (unfortunately) in very fine print that did not scan well.
Speedway Drive on the Yahoo Map is one of the entrances to the track. The track is represented on the map as if it were normal roads and highways.
Summit Point is only a 70 mile drive from the Baltimore-Washington area, through areas of rustic beauty and historical note. Traveling from the Baltimore-Frederick area brings you through Harper's Ferry, West Virginia and the confluence of the Shenandoah and Potomac Rivers. If you are driving west from the Washington area, you will pass through the rolling hills of the Virginia horse country and over the Blue Ridge mountains.
Take Route 7 west past Leesbug, toward Winchester. Turn right on Route 632. and go right at the next two \"T\" intersections. Track is on right.
Take U.S. 340 through Charles Town, then go straight on WV Route 51 for one block. Bear left onto Summit Point Road (Route 13). Track is on the left one half mile past the town of Summit Point.
From U.S. 81 take Route 7 east for approximately 7 miles and turn left on Route 632. Turn right at next two \"T\" intersections. Track is on right.
", racersGuide => '', hotLap => "Pete Cage is chief instructor for the Washington, D.C. Region of the SCCA, and instructs for many marque clubs and other events at SPR. He has logged well over 40,000 laps at the track in vehicles ranging from a Mercury Marquis station wagon to a Tiga/Ferrari Camel Lights car. He recently held the Club Ford lap record at the track.
This hot lap description was recently revised to reflect changes at the race track. It is copyright 1996, 1997, 1998, 1999 by A.F. Cage, and was last revised on 5/4/1999.
Summit Point is considered by many to be a true \"driver's\" track, with a unique combination of turns and straights that seems to favor no particular type of car. There are several different types of surface compounds at different locations around the track, and each of these has a different grip characteristic. The track is relatively slippery, especially in the wet, and conditions seem to change with each session. It's a course that rewards smoothness and commitment. Walking the course will help the driver spot landmarks and pavement changes that pass by too quickly at speed.
Use this as a guide; your line may vary. I've found that the basic line is pretty consistent among a wide variety of cars, with minor adjustments for power differences and driving styles.
The front straight is 3000 feet long, and is entered at fairly high speed from Turn 10 (Paddock Bend). The straight runs up a slight incline until near Start/Finish, then begins a slight descent. Low cars may bottom over some bumps about 2/3 of the way through.
The last portion of the front straight has recently been repaved with smooth, grippy asphalt. There are five white painted brake markers along each side of the track, spaced at 100-foot intervals. The markers are large and easy to spot from well up the track.
In the event of braking failure, an access road leads slightly left off the end of the straight to the skidpad area. There is a gravel trap directly off the end of the turn, which will catch your car unless you enter it in a straight line and keep moving.
Turns 1 and 2 combine to produce an increasing-radius, 180-degree right hander. There is a crosshatched concrete patch, about eight feet wide, that leads from the entry of Turn 1 until past the apex. Begin your turn in at the left edge of the concrete, making sure to keep your left tires on the patch. Apex by the red dot on the curbing, taking care not to hit the curbing too hard, as it will pitch the car up on two wheels and may cause a rollover. Accelerate hard through the turn as you unwind the steering, taking as wide a line as necessary to keep the rear end in line. Be aware of the transitions onto and off of the new paving after the concrete ends, as the bumps may upset your car if it is near its adhesion limit. An access road on driver's left can be used as a track out point for more powerful cars (but watch out for the hole as the pavement ends.) A smoothly increasing radius will bring the car back to the right edge of the track just as the track straightens out. Keep the car to the right as you head toward Turn 3 (Wagon Bend.)
Turn 3 is a tricky, uphill left-hander with a somewhat blind exit. Most cars will require some light braking for the entry, although it will be more of a squeeze to settle the car than outright threshold braking. If you are a left-foot braker, this turn is a good candidate for that technique. There are two access roads to the right that can be used for reference points. There is also a sharp bump/dip combination near the entry that requires some brake modulation to avoid upsetting the car. The track curves a bit before the entry point so you can either follow the track edge or go straight toward the entry, leaving the track edge. I prefer a straight entry, as it leaves a bit of pavement to play with if the car should wiggle under braking. Turn in from the extreme right edge of the track. The turn in is earlier than you may want to believe, since the exit cannot be seen from the turn-in point. Adjust your actual turn-in point to suit your car and driving style. The entry is level, and the car will slide a bit until the uphill portion catches the car. Apex toward the middle of the curbing (look for another red dot) and let the car track out onto the red and white exit curbing as it moves left to greet you. The gravel trap begins at the exit curbing, so be careful not to run wide, and watch for gravel that has been carried out onto the track surface by overzealous competitors.
At the exit of Turn 3, aim for the left-hand edge of the track where it disappears down the hill by the Black Flag station. At the crest of the hill, you'll begin to follow the left hand side of the pavement as you start down Turn 4 (The Chute.) The Chute is a very fast and scary right hander that leads downhill with precious little runoff room on either side. Taken correctly, it can save you quite a bit of lap time. When conditions permit (i.e.: car, driver, track, and weather optimal) this turn can be taken without braking, but you definitely need to work up to it gradually. Get any braking done before you turn in, and be back on the power at the entry point to transfer weight to the rear tires. Turn in from the extreme left edge of the track just as the edge of the asphalt veers sharply to the right (yes, it looks very early - there's a white paint mark there that will help you to find it) and clip the apex curbing gently at about the middle of its length. Your speed should carry the car out to the left edge of the track at the exit, which should be truly exciting if you've carried enough speed through the turn. The instant the car is straight, begin hard braking for Turn 5, the slowest turn on the course.
While a traditional line would have you enter Turn 5 from the right side of the track, it is faster to sacrifice this slow turn in favor of high speed down The Chute. Therefore, you enter Turn 5 from the left edge of the track, putting your right side wheels in the middle of the long curved concrete patch and following it around the corner and out to the middle of the track. The concrete is very grippy; beware if you should slide off of the concrete onto the asphalt, as you will most likely go for a ride! (Cars with more grip than power may be able to move a bit toward the center of the track prior to turn in for 5, but beware of would-be passers entering on your left!) Let your left turn carry you back to the left side of the track to set up for the entry to The Carousel. You should touch the left side of the track at the point where the pavement is scarred up from errant cars running off and bottoming out.
The Carousel and the Esses make up the finesse portion of Summit Point. Much time can be gained (or lost) through these turns, and a small error usually compounds itself as you go along. The grippy concrete patch through the beginning of The Carousel guides your turn in; try to keep your outside wheels in the center of the long curved patch. Hit the apex near the small white paint mark on the curbing. Let the car drift out to near the left edge where the pavement changes (leave about 2 feet, as the road goes off-camber at the edge) and allow the same arc to bring the car back to the second apex. When taken correctly, one steering wheel movement will connect entry, apex, track out, and second apex. Make the second apex quite late, and keep the car to the right of the track centerline. Make a smooth transition to the left, apexing the left-hander just past the end of the curbing. The pavement here is quite slippery, which may come as a surprise after The Carousel. Keep the car to the left side of the track to set up for the second Ess.
The second turn of the Esses is a very important turn. It leads onto the second longest straight, which runs uphill under the bridge to Turn 10. Many drivers give up quite a bit of time by entering late or pinching the exit. There is much more pavement at the exit than can be seen at the entry, and it is easy to wait too late to turn in, pinching the turn and scrubbing off precious speed for the uphill straight. Turn in at the pavement change and run along the entire length of the apex curbing. There is a bit of a heave in the pavement between the turn-in and the apex, and you may have to adjust your steering input as the available grip varies over this hump. There is also a sharp bump between the apex and the exit, but this should not upset the car unless you're already rather out of shape when you hit it. At the exit, let the car run wide to the left edge of the track, joining it near the midpoint of the red and white exit curbing. Faster cars and early-apexers can use this curbing as additional track.
Taken properly, The Carousel and The Esses will be one long acceleration zone, and will be flat out (except for shifts) in many cars when taken correctly.
From the exit of The Esses, aim the car under the center of the bridge. The road makes a long, lazy right turn between 8 and 10, which you can straighten out by driving under the center of the bridge. Your line should rejoin the left edge of the track just before the entry to Turn 10.
Turn 10 leads onto the long front straight, and a fast exit is important to good lap times. The corner, however, has a decreasing radius, which means that your physical apex will be very late as you try to fit an increasing radius line on the pavement. Most cars will need to brake for the turn, and many may need to drop down a gear, but be sure to do so smoothly so as not to upset the chassis on this fast transition. Begin your turn in just before the pavement scarification (grooving) and aim for a very late apex. Your apex point will not be visible when you turn in; walking the course is helpful here. (Hint: Look for the red spray paint dot marked \"A.\") The car should track out to the middle of the red and white curbing on your left at the exit. There is a gravel trap on driver's left similar to those at Turns 1 and 3. Near the exit of the turn, the first few feet of the trap have been paved with rough asphalt, which is a good safety net in case you should overcook it into the corner. If you use this asphalt, watch out for a big hole at the end of the curbing. If you should drop a wheel off here I recommend driving the car off driver's left rather than fighting it, or you might get to visit the tire wall on driver's right along the pit straight.
There's a lot to remember on a fast lap at Summit. Add in some traffic and passing, and you'll be pretty busy. SPR is a track of nuances; the last 5% of speed is extremely difficult to find. Keep at it, though, and you'll find the course to be as rewarding as it is challenging.
", workersGuide => '', foodInsert => '', hotelInsert => '', TOCInsertLink1 => '', TOCInsertText1 => '', TOCInsertLink2 => '', TOCInsertText2 => '', TOCInsertLink3 => '', TOCInsertText3 => '', TOCInsertLink4 => '', TOCInsertText4 => '', TOCInsertLink5 => '', TOCInsertText5 => '', TOCInsertLink6 => '', TOCInsertText6 => '', offsiteTOCInsertLink1 => '', offsiteTOCInsertText1 => '', offsiteTOCInsertLink2 => '', offsiteTOCInsertText2 => '', offsiteTOCInsertLink3 => '', offsiteTOCInsertText3 => '', offsiteTOCInsertLink4 => '', offsiteTOCInsertText4 => '', offsiteTOCInsertLink5 => '', offsiteTOCInsertText5 => '', offsiteTOCInsertLink6 => '', offsiteTOCInsertText6 => '', &>